

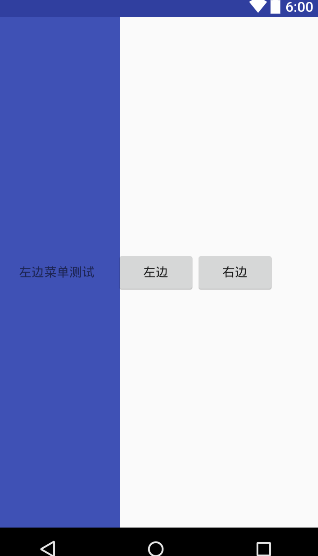
在android的v4包中有一个控件 Drawerlayout,主要实现了左拉和右拉菜单,类似于之前的“抽屉”功能,此控件使用简单,效果很柔和,操作起来体验非常好,下面是我实现的一个简单效果的部分截图:
左拉:
右拉:
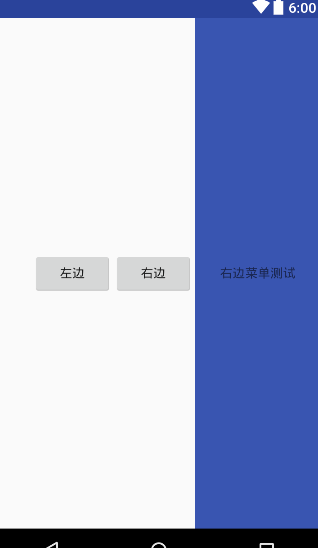
怎么样?是不是在平时开发的应用中很常见?OK,那么接下来我直接上代码:
activity_sliding.xml:
<?xml version="1.0" encoding="utf-8"?>
<android.support.v4.widget.DrawerLayout xmlns:android="http://schemas.android.com/apk/res/android"
 android:id="@+id/main_drawer_layout"
 android:layout_width="match_parent"
 android:layout_height="match_parent"
 android:background="@android:color/transparent">

 <!-- 下面显示的主要是主界面内容 -->
 <RelativeLayout
  android:id="@+id/main_content_frame_parent"
  android:layout_width="match_parent"
  android:layout_height="match_parent"
  android:background="@android:color/transparent"
  android:gravity="center">

  <Button
   android:layout_width="wrap_content"
   android:layout_height="wrap_content"
   android:layout_gravity="center"
   android:onClick="openLeftLayout"
   android:text="左边" />

  <Button
   android:layout_width="wrap_content"
   android:layout_height="wrap_content"
   android:layout_gravity="center"
   android:layout_marginLeft="100dp"
   android:onClick="openRightLayout"
   android:text="右边" />

 </RelativeLayout>

 <!-- 左侧滑动栏 -->
 <RelativeLayout
  android:id="@+id/main_left_drawer_layout"
  android:layout_width="240dp"
  android:layout_height="match_parent"
  android:layout_gravity="start"
  android:background="@color/colorPrimary"
  android:paddingTop="50dp">

  <TextView
   android:layout_width="wrap_content"
   android:layout_height="wrap_content"
   android:layout_centerInParent="true"
   android:text="左边菜单测试" />

 </RelativeLayout>

 <!-- 右侧滑动栏 -->
 <RelativeLayout
  android:id="@+id/main_right_drawer_layout"
  android:layout_width="240dp"
  android:layout_height="match_parent"
  android:layout_gravity="end"
  android:background="@color/colorPrimary"
  android:paddingTop="50dp">

  <TextView
   android:layout_width="wrap_content"
   android:layout_height="wrap_content"
   android:layout_centerInParent="true"
   android:text="右边菜单测试" />
 </RelativeLayout>


</android.support.v4.widget.DrawerLayout>
通过上面的布局文件我们发现 drawerlayout中的子布局分为content、left、right三部分,其中left和right的布局需要在layout中声明android:layout_gravity属性,值分别是start和end。很显然,drawerlayout布局类似一个大容器,超屏布局,将left的布局放在了控件的开始地方,right的布局放在了控件结尾的地方。
DrawerSlidingActivity.java:
import android.graphics.Color;
import android.os.Bundle;
import android.support.v4.app.ActionBarDrawerToggle;
import android.support.v4.widget.DrawerLayout;
import android.support.v7.app.AppCompatActivity;
import android.view.View;
import android.widget.RelativeLayout;

public class DrawwerSlidingActivity extends AppCompatActivity {

 // 抽屉菜单对象
 private ActionBarDrawerToggle drawerbar;
 public DrawerLayout drawerLayout;
 private RelativeLayout main_left_drawer_layout, main_right_drawer_layout;

 @Override
 protected void onCreate(Bundle arg0) {
  super.onCreate(arg0);
  setContentView(R.layout.activity_slidingmenu);

  initLayout();
  initEvent();
 }

 public void initLayout() {
  drawerLayout = (DrawerLayout) findViewById(R.id.main_drawer_layout);

  //设置菜单内容之外其他区域的背景色
  drawerLayout.setScrimColor(Color.TRANSPARENT);

  //左边菜单
  main_left_drawer_layout = (RelativeLayout) findViewById(R.id.main_left_drawer_layout);
  //右边菜单
  main_right_drawer_layout = (RelativeLayout) findViewById(R.id.main_right_drawer_layout);

 }

 //设置开关监听
 private void initEvent() {
  drawerbar = new ActionBarDrawerToggle(this, drawerLayout, R.mipmap.ic_launcher, R.string.open, R.string.close) {
   //菜单打开
   @Override
   public void onDrawerOpened(View drawerView) {
    super.onDrawerOpened(drawerView);
   }

   // 菜单关闭
   @Override
   public void onDrawerClosed(View drawerView) {
    super.onDrawerClosed(drawerView);
   }
  };

  drawerLayout.setDrawerListener(drawerbar);
 }

 //左边菜单开关事件
 public void openLeftLayout(View view) {
  if (drawerLayout.isDrawerOpen(main_left_drawer_layout)) {
   drawerLayout.closeDrawer(main_left_drawer_layout);
  } else {
   drawerLayout.openDrawer(main_left_drawer_layout);
  }
 }

 // 右边菜单开关事件
 public void openRightLayout(View view) {
  if (drawerLayout.isDrawerOpen(main_right_drawer_layout)) {
   drawerLayout.closeDrawer(main_right_drawer_layout);
  } else {
   drawerLayout.openDrawer(main_right_drawer_layout);
  }
 }
}
其中要注意的地方一是:drawerLayout.setScrimColor(Color.TRANSPARENT),此属性设置的是侧滑布局显示时内容之外区域的背景颜色,默认是灰色,这里我为了大家看着清晰就设置成透明的了;二是drawerLayout的监听器ActionBarDrawerToggle,而ActionBarDrawerToggle对象我们通过查阅ActionBarDrawerToggle的源码发现它是DrawerListener的实现类,也就是说ActionBarDrawerToggle通过实现DrawerListener监听,在此基础上封装了onDrawerOpened、onDrawerClosed、onDrawerStateChanged和onDrawerSlide的事件处理,以便于开发者在滑动过程中自定义要处理的一些操作。
最后检查一下你的AS是不是最新版,如果不是的话,则需要在build.gradle中增加以下配置:
compile 'com.android.support:appcompat-v7:24.2.1'


