

项目中有时候会用到虚线,怎么办?drawable下创建一个shape类型的xml文件绘制,然后引用到view的background下?如果用到虚线的地方很多呢?创建多个,分别引用?横向的还好说,竖向的呢?垂直的虚线,普通的创建是显示不出来的,如果需要,就要进行旋转等的操作。但是,还是那个问题,需要很多个怎么办?挨个创建?
完全没必要,写个自定义,对外暴露设置虚线属性的方法就行。源码如下:
最后的说明很重要!!!
最后的说明很重要!!!
最后的说明很重要!!!
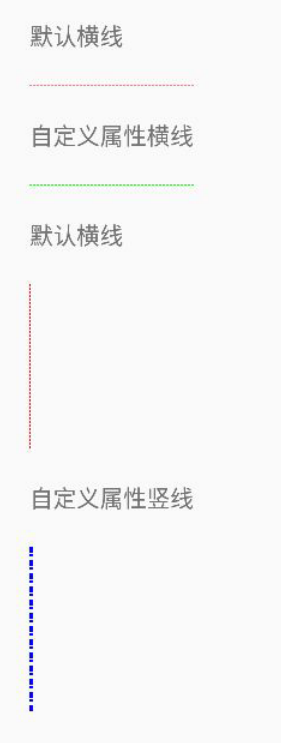
效果图:
源码:
ImaginaryLineView
package com.chen.demo;

import android.content.Context;
import android.graphics.Canvas;
import android.graphics.DashPathEffect;
import android.graphics.Paint;
import android.graphics.Path;
import android.graphics.PathEffect;
import android.support.annotation.Nullable;
import android.util.AttributeSet;
import android.view.View;

/**
 * 自定义垂直虚线view
 * chenjianqiang
 * 2017/6/14
 * <p>
 * 使用方法:
 * 在代码中findview之后,调用setLineAttribute方法,自定义虚线颜色及宽度
 */
public class ImaginaryLineView extends View {

 private Context ct;
 private Paint mPaint;
 private Path mPath;
 private PathEffect effects;
 private int width;
 private int height;

 private int defaultColor=0xffff0000;

 public ImaginaryLineView(Context context) {
 this(context, null);
 }

 public ImaginaryLineView(Context context, @Nullable AttributeSet attrs) {
 this(context, attrs, -1);
 }

 public ImaginaryLineView(Context context, @Nullable AttributeSet attrs, int defStyleAttr) {
 super(context, attrs, defStyleAttr);

 ct = context;
 init();
 }

 @Override
 protected void onSizeChanged(int w, int h, int oldw, int oldh) {
 super.onSizeChanged(w, h, oldw, oldh);
 width = w;
 height = h;

 }

 private void init() {

 //初始化,并打开抗锯齿
 mPaint = new Paint(Paint.ANTI_ALIAS_FLAG);
 mPaint.setStyle(Paint.Style.STROKE);
 mPaint.setColor(defaultColor);
 mPaint.setStrokeWidth(dip2px(ct, 1));

 mPath = new Path();
 //数组含义:里面最少要有2个值,值的个数必须是偶数个。偶数位(包含0),表示实线长度,奇数位表示断开的长度
 effects = new DashPathEffect(new float[]{4, 2}, 0);


 }

 /**
 * 设置线的必要属性
 *
 * @param color 十六进制颜色值
 * @param lineWidth 虚线宽度,单位是dp
 */
 public void setLineAttribute(int color, float lineWidth,float[] f) {

 if (color == 0) {
  color = defaultColor;
 }
 if (lineWidth == 0) {
  lineWidth = 1;
 }
 if(f==null){
  f=new float[]{4,2};
 }
 effects = new DashPathEffect(f, 0);

 mPaint.setStrokeWidth(dip2px(ct, lineWidth));
 mPaint.setColor(color);

 invalidate();
 }

 @Override
 protected void onDraw(Canvas canvas) {
 super.onDraw(canvas);

 //定义起点
 mPath.moveTo(0, 0);
 //定义终点
 if(width>height){
  //宽度比高度大,是横线
  mPath.lineTo(width, 0);
 }else{
  //竖线。(根据实际情况,这里不考虑宽高相等情况)
  mPath.lineTo(0, height);
 }

 mPaint.setPathEffect(effects);

 canvas.drawPath(mPath, mPaint);
 }

 private static int dip2px(Context context, float dpValue) {
 final float scale = context.getResources().getDisplayMetrics().density;
 return (int) (dpValue * scale + 0.5f);
 }

}
activity_main
<?xml version="1.0" encoding="utf-8"?>
<LinearLayout
 xmlns:android="http://schemas.android.com/apk/res/android"
 android:layout_width="match_parent"
 android:layout_height="match_parent"
 android:orientation="vertical">

 <TextView
 android:text="默认横线"
 android:layout_marginStart="20dp"
 android:layout_marginTop="20dp"
 android:layout_width="wrap_content"
 android:layout_height="wrap_content"/>

 <com.chen.demo.ImaginaryLineView

 android:background="#5500ff00"
 android:layout_marginStart="20dp"
 android:layout_marginTop="20dp"
 android:layout_width="100dp"
 android:layout_height="1dp"/>

 <TextView
 android:text="自定义属性横线"
 android:layout_marginStart="20dp"
 android:layout_marginTop="20dp"
 android:layout_width="wrap_content"
 android:layout_height="wrap_content"/>

 <com.chen.demo.ImaginaryLineView
 android:id="@+id/horizontal_line"
 android:layout_marginStart="20dp"
 android:layout_marginTop="20dp"
 android:layout_width="100dp"
 android:layout_height="1dp"/>

 <TextView
 android:text="默认横线"
 android:layout_marginStart="20dp"
 android:layout_marginTop="20dp"
 android:layout_width="wrap_content"
 android:layout_height="wrap_content"/>

 <com.chen.demo.ImaginaryLineView
 android:layout_marginStart="20dp"
 android:layout_marginTop="20dp"
 android:layout_width="2dp"
 android:layout_height="100dp"/>

 <TextView
 android:text="自定义属性竖线"
 android:layout_marginStart="20dp"
 android:layout_marginTop="20dp"
 android:layout_width="wrap_content"
 android:layout_height="wrap_content"/>

 <com.chen.demo.ImaginaryLineView
 android:id="@+id/vertical_line"
 android:layout_marginStart="20dp"
 android:layout_marginTop="20dp"
 android:layout_width="2dp"
 android:layout_height="100dp"/>


</LinearLayout>
MainActivity
package com.chen.demo;

import android.app.Activity;
import android.os.Bundle;
import android.view.Window;

public class MainActivity extends Activity {

 private ImaginaryLineView horizontal_line;
 private ImaginaryLineView vertical_line;

 @Override
 protected void onCreate(Bundle savedInstanceState) {
 super.onCreate(savedInstanceState);
 requestWindowFeature(Window.FEATURE_NO_TITLE);
 setContentView(R.layout.activity_main);

 horizontal_line= (ImaginaryLineView) findViewById(R.id.horizontal_line);
 horizontal_line.setLineAttribute(0xff00ff00,5,null);


 vertical_line= (ImaginaryLineView) findViewById(R.id.vertical_line);
 vertical_line.setLineAttribute(0xff0000ff,5,new float[]{10,2,5,5});


 }

}
说明:
1、这个自定义view,会自动判断是水平还是竖直。自己仅仅需要在布局文件中设置了宽高就行。
2、在自定义的源码中,仅仅是粗略的限定了虚线路径,准确的说,应该是宽的中点到高的中点,因为一般的虚线都是1px,或者1dp宽,少数会到2dp,这么窄的值,取不取中点无所谓。如果虚线很宽,就会有一点误差,如图:

蓝色的是绘制出来的虚线,但是这个虚线10dp宽,即:虚线画笔比设置的宽度要小,就会这样。不过一般不会有种情况。如果遇到,根据实际情况修改即可
3、不建议为了省事而把终点设置为:mPath.lineTo(width, height);
4、需要虚线的时候,布局到文件中,setLineAttribute即可,不用每次都新建一个shape
以上就是本文的全部内容,希望对大家的学习有所帮助,也希望大家多多支持脚本之家。


