

QQ的滑动删除效果很不错,要实现这种效果,可以使用SwipeListView。
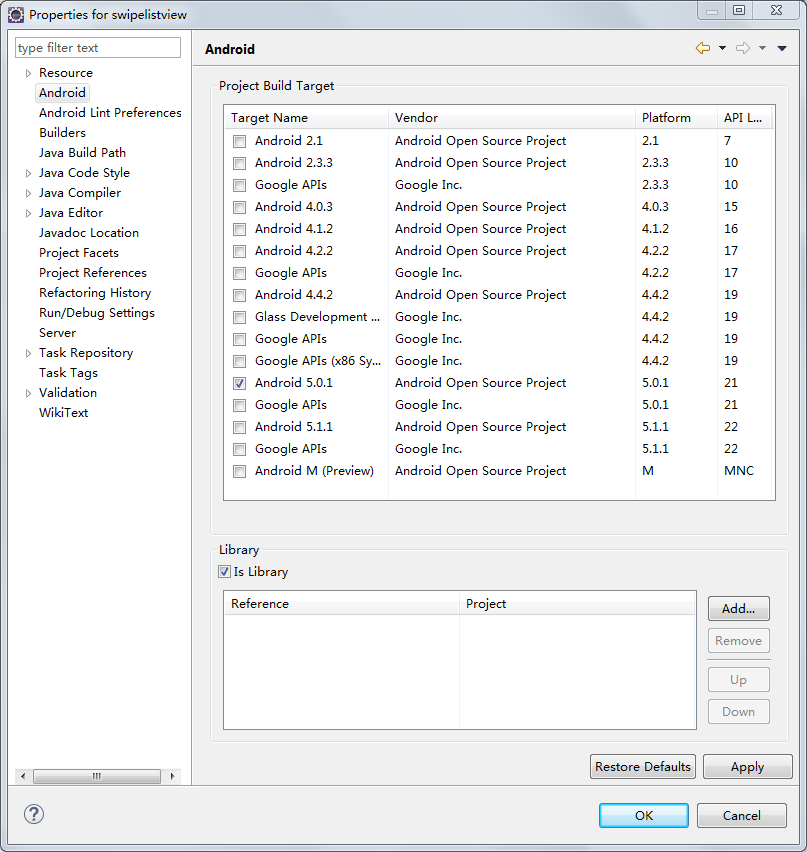
1. 下载com.fortysevendeg.swipelistview这个项目(以前GitHub上有,现在GitHub上没有了,百度了很多次才下载到的),导入Eclipse,右键单击,选择Properties->Android,选中Library下面的IsLibrary。
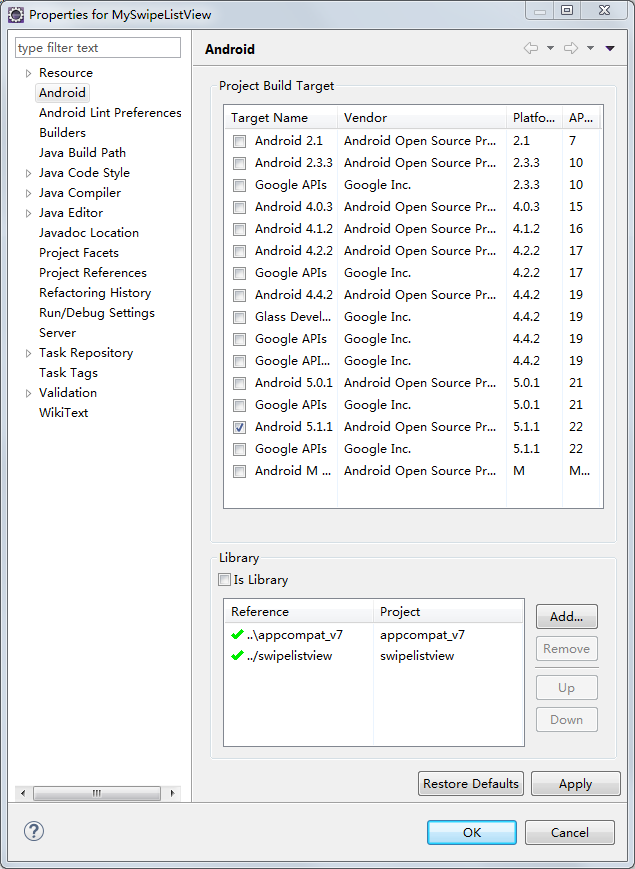
2. 新建一个项目MySwipeListView,加入SwipeListView这个库。
3. 在主窗体里面放入一个SwipeListView控件:
<LinearLayout xmlns:android="http://schemas.android.com/apk/res/android"
  xmlns:tools="http://schemas.android.com/tools"
  android:layout_width="match_parent"
  android:layout_height="match_parent"
  android:orientation="vertical"
  android:paddingBottom="@dimen/activity_vertical_margin"
  android:paddingLeft="@dimen/activity_horizontal_margin"
  android:paddingRight="@dimen/activity_horizontal_margin"
  android:paddingTop="@dimen/activity_vertical_margin"
  tools:context="com.hzhi.myswipelistview.MainActivity" >

    <com.fortysevendeg.swipelistview.SwipeListView
      xmlns:swipe="http://schemas.android.com/apk/res-auto"
      android:id="@+id/exampleSwipeListView"
      android:listSelector="#00000000"
      android:layout_width="fill_parent"
      android:layout_height="wrap_content"
      swipe:swipeBackView="@+id/back"
      swipe:swipeCloseAllItemsWhenMoveList="true"
      swipe:swipeDrawableChecked="@drawable/choice_selected"
      swipe:swipeDrawableUnchecked="@drawable/choice_unselected"
      swipe:swipeFrontView="@+id/front"
      swipe:swipeMode="both"
      swipe:swipeActionLeft="reveal"
      swipe:swipeActionRight="dismiss"
      swipe:swipeOpenOnLongPress="true"
    />

</LinearLayout>
其中两个重要的属性:
swipe:swipeFrontView:上面的View,即不滑动时显示的View。
swipe:swipeBackView:下面的View,即滑动后显示的View。
这两个View都定义在SwipeListView的行布局文件里面:
<?xml version="1.0" encoding="utf-8"?>

<FrameLayout xmlns:android="http://schemas.android.com/apk/res/android"
       android:layout_width="fill_parent"
       android:layout_height="fill_parent"
    >

  <LinearLayout
    android:id="@+id/back"
    android:layout_width="fill_parent"
    android:layout_height="wrap_content"
    android:background="#ffcccccc"
    android:gravity="right"
    android:tag="back" >

    <Button
        android:layout_width="wrap_content"
        android:layout_height="wrap_content"
        android:id="@+id/btn_delete"
        android:text="删除"/>

    <Button
        android:layout_width="wrap_content"
        android:layout_height="wrap_content"
        android:id="@+id/btn_update"
        android:text="更新"/>

  </LinearLayout>

  <RelativeLayout
      android:orientation="vertical"
      android:id="@+id/front"
      android:layout_width="fill_parent"
      android:layout_height="wrap_content"
      android:background="#ffffffff"
  >

    <ImageView
        android:layout_width="wrap_content"
        android:layout_height="wrap_content"
        android:id="@+id/example_row_iv_image"/>

    <TextView
        android:layout_width="fill_parent"
        android:layout_height="wrap_content"
        android:layout_toRightOf="@id/example_row_iv_image"
        android:id="@+id/example_row_tv_title"/>

    <TextView
        android:layout_width="fill_parent"
        android:layout_height="wrap_content"
        android:layout_toRightOf="@id/example_row_iv_image"
        android:layout_below="@id/example_row_tv_title"
        android:id="@+id/example_row_tv_description"/>

  </RelativeLayout>


</FrameLayout>
SwipeListView的行布局文件使用FrameLayout布局,FrameLayout里面所有的所有子元素都堆叠在FrameLayout的左上角。
4. SwipeListView和其他ListView一样,也需要Adapter,使用方法也是一样的。这里就不详细讲了。
5. 在主窗体Java文件中实现SwipeListView的功能,代码如下:
package com.hzhi.myswipelistview;

import android.support.v7.app.ActionBarActivity;
import android.util.Log;

import java.util.ArrayList;

import com.fortysevendeg.swipelistview.BaseSwipeListViewListener;
import com.fortysevendeg.swipelistview.SwipeListView;

import android.os.Bundle;

@SuppressWarnings("deprecation")
public class MainActivity extends ActionBarActivity {

  protected static final String TAG = "MySwipeListView";
  private ArrayList<String> mList;
  private MyAdapter mAdapter;
  private SwipeListView mSwipeListView;

  @Override
  protected void onCreate(Bundle savedInstanceState) {
    super.onCreate(savedInstanceState);
    setContentView(R.layout.activity_main);

    initData();
    mSwipeListView = (SwipeListView) findViewById(R.id.exampleSwipeListView);
    mAdapter = new MyAdapter(this, mList, mSwipeListView);
    mSwipeListView.setAdapter(mAdapter);

    mSwipeListView.setSwipeListViewListener(new BaseSwipeListViewListener(){
      @Override
      public void onChoiceChanged(int position, boolean selected)
      {
        Log.d(TAG, "onChoiceChanged:" + position + ", " + selected);
      }

      @Override
      public void onChoiceEnded()
      {
        Log.d(TAG, "onChoiceEnded");
      }

      @Override
      public void onChoiceStarted()
      {
        Log.d(TAG, "onChoiceStarted");
      }

      @Override
      public void onClickBackView(int position)
      {
        Log.d(TAG, "onClickBackView:" + position);
      }

      @Override
      public void onClickFrontView(int position)
      {
        Log.d(TAG, "onClickFrontView:" + position);
      }

      @Override
      public void onClosed(int position, boolean fromRight)
      {
        Log.d(TAG, "onClosed:" + position + "," + fromRight);
      }

      @Override
      public void onDismiss(int[] reverseSortedPositions)
      {
        Log.d(TAG, "onDismiss");
      }

      @Override
      public void onFirstListItem()
      {
        Log.d(TAG, "onFirstListItem");
      }

      @Override
      public void onLastListItem()
      {
        Log.d(TAG, "onLastListItem");
      }

      @Override
      public void onListChanged()
      {
        Log.d(TAG, "onListChanged");
        mSwipeListView.closeOpenedItems();

      }

      @Override
      public void onMove(int position, float x)
      {
        Log.d(TAG, "onMove:" + position + "," + x);
      }

      @Override
      public void onOpened(int position, boolean toRight)
      {
        Log.d(TAG, "onOpened:" + position + "," + toRight);
      }

      @Override
      public void onStartClose(int position, boolean right)
      {
        Log.d(TAG, "onStartClose:" + position + "," + right);
      }

      @Override
      public void onStartOpen(int position, int action, boolean right)
      {
        Log.d(TAG, "onStartOpen:" + position + "," + action + "," + right);
      }
    });

  }

  private void initData(){
    mList = new ArrayList<String>();
    for (int i = 0; i <= 10; i++)
      mList.add("这是第" + i +"条数据!");
  }

}
最主要的代码即mSwipeListView.setSwipeListViewListener(new BaseSwipeListViewListener(){}),通过这行代码,为SwipeListView控件设置了Listener,可以根据自己的需要重载BaseSwipeListViewListener的各种方法。
运行结果:

以上就是本文的全部内容,希望对大家的学习有所帮助,也希望大家多多支持脚本之家。


