

本文实例讲述了Android通过json向MySQL中写入数据的方法。分享给大家供大家参考,具体如下:
先说一下如何通过json将Android程序中的数据上传到MySQL中:
首先定义一个类JSONParser.Java类,将json上传数据的方法封装好,可以直接在主程序中调用该类,代码如下
public class JSONParser {
static InputStream is = null;
static JSONObject jObj = null;
static String json = "";
// constructor
public JSONParser() {
}
// function get json from url
// by making HTTP POST
public JSONObject makeHttpRequest(String url, String method,
List<NameValuePair> params) {
// Making HTTP request
try {
// request method is POST
// defaultHttpClient
DefaultHttpClient httpClient = new DefaultHttpClient();
HttpPost httpPost = new HttpPost(url);
httpPost.setEntity(new UrlEncodedFormEntity(params,HTTP.UTF_8));
HttpResponse httpResponse = httpClient.execute(httpPost);
HttpEntity httpEntity = httpResponse.getEntity();
is = httpEntity.getContent();
} catch (UnsupportedEncodingException e) {
e.printStackTrace();
} catch (ClientProtocolException e) {
e.printStackTrace();
} catch (IOException e) {
e.printStackTrace();
}
try {
BufferedReader reader = new BufferedReader(new InputStreamReader(
is, "UTF-8"));
StringBuilder sb = new StringBuilder();
String line = null;
while ((line = reader.readLine()) != null) {
sb.append(line + "\n");
}
is.close();
json = sb.toString();
} catch (Exception e) {
Log.e("Buffer Error", "Error converting result " + e.toString());
Log.d("json", json.toString());
}
// try parse the string to a JSON object
try {
jObj = new JSONObject(json);
} catch (JSONException e) {
Log.e("JSON Parser", "Error parsing data " + e.toString());
}
// return JSON String
return jObj;
}
}
主程序中这样调用:
params = new ArrayList<NameValuePair>();
//这里可以替换成你自己程序中的一些键值对
params.add(new BasicNameValuePair("time", ""+time));
params.add(new BasicNameValuePair("lat", ""+lat));
params.add(new BasicNameValuePair("lon", ""+lon));
params.add(new BasicNameValuePair("encyptiontype",encyptiontype));
params.add(new BasicNameValuePair("rssi",rssi));
params.add(new BasicNameValuePair("name",name));
JSONParser jsonParser = new JSONParser();
//数据的php文件的路径
String url_up = "******/文件名字.php";
try{
JSONObject json = jsonParser.makeHttpRequest(url_up,"POST", params);
Log.v("uploadsucceed", "uploadsucceed");
}catch(Exception e){
e.printStackTrace();
}
最后就是定义一个接收数据的php文件:
<?php
// array for JSON response
//此处需要将数据库名和表明还有密码做相应修改,改成你自己的
$con = mysql_connect("localhost","root",null);
if (!$con) {
die('Could not connect:'.mysql_error() );
}
mysql_select_db("a0722152915", $con);
$response = array();
include("conn.php");
// check for required fields
if (isset($_POST['time']) && isset($_POST['lat']) && isset($_POST['lon'])&& isset($_POST['encyptiontype'])&& isset($_POST['rssi'])&& isset($_POST['name'])) {
$time = $_POST['time'];
$lat = $_POST['lat'];
$lon = $_POST['lon'];
$encyptiontype = $_POST['encyptiontype'];
$rssi = $_POST['rssi'];
$name = $_POST['name'];
$result = mysql_query("INSERT INTO wifi_state(time, lat, lon,encyptiontype,rssi,name) VALUES('$time', '$lat', '$lon','$encyptiontype','$rssi','$name')");
echo $result;
// check if row inserted or not
if ($result) {
// successfully inserted into database
$response["success"] = 1;
$response["message"] = "Product successfully created.";
// echoing JSON response
echo json_encode($response);
} else {
// failed to insert row
$response["success"] = 0;
$response["message"] = "Oops! An error occurred.";
// echoing JSON response
echo json_encode($response);
}
} else {
// required field is missing
$response["success"] = 0;
$response["message"] = "Required field(s) is missing";
// echoing JSON response
echo json_encode($response);
}
?>
注意:如果你的设备中android操作系统是4.0以上的,那么要在主程序中加上下面一段代码,才能上传成功
StrictMode.setThreadPolicy(new StrictMode.ThreadPolicy.Builder()
  .detectDiskReads()
  .detectDiskWrites()
  .detectNetwork() // or .detectAll() for all detectable problems
  .penaltyLog()
  .build());
  StrictMode.setVmPolicy(new StrictMode.VmPolicy.Builder()
  .detectLeakedSqlLiteObjects()
  .detectLeakedClosableObjects()
  .penaltyLog()
  .penaltyDeath()
  .build());
如果是4.0以下的操作系统当然不用加了
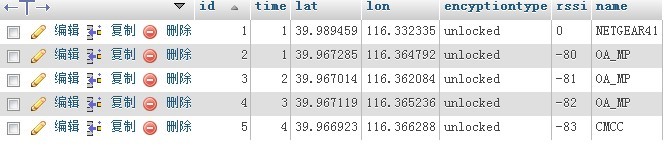
下面是上传成功后的效果图:
读数据的方法讲放在下一篇《Android通过json向MySQL中读写数据的方法详解【读取篇】》中介绍
更多关于Android相关内容感兴趣的读者可查看本站专题:《Android操作json格式数据技巧总结》、《Android数据库操作技巧总结》、《Android编程之activity操作技巧总结》、《Android文件操作技巧汇总》、《Android编程开发之SD卡操作方法汇总》、《Android开发入门与进阶教程》、《Android资源操作技巧汇总》、《Android视图View技巧总结》及《Android控件用法总结》
希望本文所述对大家Android程序设计有所帮助。


