

样式如下所示:
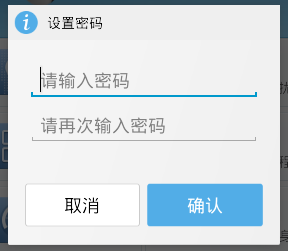
布局:
layout
dialog_set_pwd.xml
<?xml version="." encoding="utf-"?>
<LinearLayout xmlns:android="http://schemas.android.com/apk/res/android"
android:layout_width="match_parent"
android:layout_height="match_parent"
android:orientation="vertical" >
<LinearLayout
android:layout_width="match_parent"
android:layout_height="wrap_content"
android:background="#EFEFEF"
android:orientation="horizontal"
android:padding="dp" >
<ImageView
android:layout_width="wrap_content"
android:layout_height="wrap_content"
android:src="@drawable/dialog_title_default_icon" />
<TextView
android:id="@+id/textView"
android:layout_width="wrap_content"
android:layout_height="wrap_content"
android:layout_marginLeft="dp"
android:text="设置密码"
android:textColor="@color/black"
android:textSize="sp" />
</LinearLayout>
<EditText
android:id="@+id/et_pwd"
android:layout_width="match_parent"
android:layout_height="wrap_content"
android:layout_margin="dp"
android:hint="请输入密码"
android:inputType="textPassword" >
</EditText>
<EditText
android:id="@+id/et_pwd_confirm"
android:layout_width="match_parent"
android:layout_height="wrap_content"
android:layout_margin="dp"
android:hint="请再次输入密码"
android:inputType="textPassword" />
<LinearLayout
android:layout_width="match_parent"
android:layout_height="wrap_content"
android:orientation="horizontal"
android:padding="dp" >
<Button
android:id="@+id/btn_ok"
android:layout_width="dp"
android:layout_height="wrap_content"
android:layout_weight=""
android:background="@drawable/btn_blue_selector"
android:text="确定"
android:layout_marginRight="dp"
android:textColor="@color/white" />
<Button
android:id="@+id/btn_cancel"
android:layout_width="dp"
android:layout_height="wrap_content"
android:layout_weight=""
android:background="@drawable/btn_white_selector"
android:text="取消"
android:textColor="@color/black" />
</LinearLayout>
</LinearLayout>
状态选择器:
drawable
btn_blue_selector.xml
<?xml version="." encoding="utf-"?>
<selector xmlns:android="http://schemas.android.com/apk/res/android">
<item android:drawable="@drawable/dg_btn_confirm_select" android:state_pressed="true"></item>
<item android:drawable="@drawable/dg_btn_confirm_normal"></item>
</selector>
btn_white_selector.xml
<?xml version="." encoding="utf-"?>
<selector xmlns:android="http://schemas.android.com/apk/res/android">
<item android:drawable="@drawable/dg_button_cancel_select" android:state_pressed="true"></item>
<item android:drawable="@drawable/dg_button_cancel_normal"></item>
</selector>
引用值
values
colors.xml
<?xml version="." encoding="utf-"?>
<resources>
<color name="black">#</color>
<color name="gray">#a</color>
<color name="white">#fff</color>
<color name="red">#f</color>
<color name="shape_setting_normal">#BDEE</color>
<color name="shape_setting_pressed">#CAD</color>
<color name="blue">#FD</color>
<color name="light_green">#f</color>
</resources>
代码:
private void showSetPwdDialog() {
AlertDialog.Builder builder = new AlertDialog.Builder(this);
View view = View.inflate(this, R.layout.dialog_set_pwd, null);
Button btnOk = (Button) view.findViewById(R.id.btn_ok);
Button btnCancel = (Button) view.findViewById(R.id.btn_cancel);
final EditText etPwd = (EditText) view.findViewById(R.id.et_pwd);
final EditText etPwdConfirm = (EditText) view
.findViewById(R.id.et_pwd_confirm);
builder.setView(view);//将当前布局对象设置给dialog
final AlertDialog dialog = builder.create();
btnOk.setOnClickListener(new OnClickListener() {
@Override
public void onClick(View v) {
String pwd = etPwd.getText().toString().trim();
String pwdConfirm = etPwdConfirm.getText().toString().trim();
if (TextUtils.isEmpty(pwd) || TextUtils.isEmpty(pwdConfirm)) {
ToastUtils.showToast(getApplicationContext(), "输入内容不能为空!");
} else {
if (pwd.equals(pwdConfirm)) {
System.out.println("登录成功!");
//将密码保存在本地sp
PrefUtils.putString(getApplicationContext(),
GlobalConstants.PREF_PASSWORD,
MDUtils.getMd(pwd));
dialog.dismiss();
enterLostAndFindPage();
} else {
ToastUtils.showToast(getApplicationContext(),
"两次密码不一致!");
}
}
}
});
btnCancel.setOnClickListener(new OnClickListener() {
@Override
public void onClick(View v) {
dialog.dismiss();
}
});
dialog.show();
}
有关Android 自定义对话框 showSetPwdDialog,小编就给大家介绍这么多,希望对大家有所帮助!


