

在android的项目开发中,都会遇到后期功能拓展增强与主程序代码变更的现实矛盾,也就是程序的灵活度。 由于linux平台的安全机制,再加上dalvik的特殊机制,各种权限壁垒,使得开发一个灵活多变的程序,变得比较困难,不像pc平台下那么容易。
这里实际上可以借鉴传统软件中扩展程序的方法: 也就是插件的实现. 如目前所有的浏览器,比如我们使用的eclipse,以及很多优秀的软件,都使用了此种方式. 这样轻松实现了软件的功能扩展,而升级功能时只用更新对应插件, 而不是需要更新整个应用,降低了程序的耦合度.
而在Android中的实现思路,即为将一个较大的APK,分离为一个主程序的APK,和其他各种较小的APK.
典型的应用为手机QQ换肤的实现方式:
QQ的皮肤是一个无界面APK应用,这个皮肤应用中的资源和主程序的资源命名一致,通过主程序和皮肤程序共享进程实现主程序对皮肤程序中资源的访问,在程序运行时通过代码显示指定皮肤资源,缺点是在主程序中每个activity要增加复杂的使用哪种皮肤逻辑
本例实现效果如下:
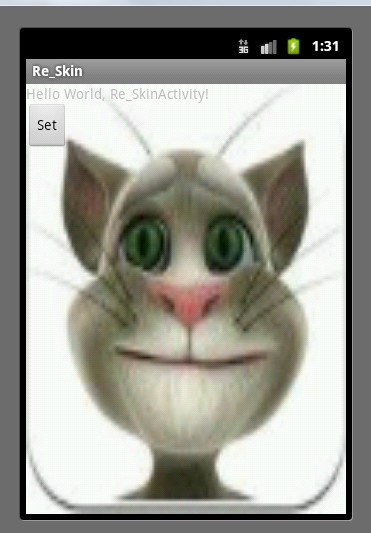

下面分析下具体思路:
android下,默认的情况是,每个apk相互独立的,基本上每个应用都是一个dalvik虚拟机,都有一个uid,再配合上linux本身的权限机制,使得apk互通很难直接进行。但作为一个独立应用的集成,不管多少个apk,都可以并为一个单独的dalvik虚拟机,直观的反映给开发人员就是在shell下列出进程,那几个apk同时加载后,会一个进程存在。
可以在清单文件中加入如下配置:
android:sharedUserId="com.tony.test"
android:sharedUserId是指共用一个uid,也就是,凡是这个属性相同的工程,都会共用同一个uid,这样,权限壁垒就消除了,dalvik也会融合为一个,可以测试一下,写几个工程,没有这个属性和有这个属性的情况下,同时运行,在列出当前进程,就直观的说明了。
下面还是用代码说明,一共分为两部分. 主程序 Re_Skin和皮肤程序Re_Skin1
首先是主应用程序代码:
1. 清单文件AndroidManifest.xml:
<?xml version="1.0" encoding="utf-8"?>
<manifest xmlns:android="http://schemas.android.com/apk/res/android"
   package="com.tony.reskin"
   android:versionCode="1"
   android:versionName="1.0" <span style="color:#FF0000;">android:sharedUserId="com.tony.skin"</span>>
  <uses-sdk android:minSdkVersion="7" />

  <application android:icon="@drawable/icon" android:label="@string/app_name">
    <activity android:name="com.tony.reskin.Re_SkinActivity"
         android:label="@string/app_name">
      <intent-filter>
        <action android:name="android.intent.action.MAIN" />
        <category android:name="android.intent.category.LAUNCHER" />
      </intent-filter>
    </activity>

  </application>
</manifest>
2. 布局文件:
<?xml version="1.0" encoding="utf-8"?>
<LinearLayout xmlns:android="http://schemas.android.com/apk/res/android"
  android:orientation="vertical"
  android:layout_width="fill_parent"
  android:layout_height="fill_parent"
  android:id="@+id/layout"  >
<TextView
  android:layout_width="fill_parent"
  android:layout_height="wrap_content"
  android:text="@string/hello"
  />
<Button android:text="Set" android:id="@+id/button1" android:layout_width="wrap_content" android:layout_height="wrap_content"></Button>

</LinearLayout>
3. Re_SkinActivity;(主要的皮肤更换逻辑实现类)
package com.tony.reskin;


import android.app.Activity;
import android.content.Context;
import android.content.pm.PackageManager.NameNotFoundException;
import android.os.Bundle;
import android.os.Handler;
import android.view.View;
import android.view.View.OnClickListener;
import android.widget.Button;
import android.widget.LinearLayout;

public class Re_SkinActivity extends Activity {
  private LinearLayout layout;
  private Button btnSet;
  <span style="color:#FF0000;">private Context friendContext;</span>
  /** Called when the activity is first created. */
  @Override
  public void onCreate(Bundle savedInstanceState) {

    super.onCreate(savedInstanceState);
    setContentView(R.layout.main);
    btnSet = (Button)findViewById(R.id.button1);
    layout = (LinearLayout)findViewById(R.id.layout);
    layout.setBackgroundResource(R.drawable.bg);

    try {
    <span style="color:#FF0000;">friendContext = createPackageContext("com.tony.reskin1", Context.CONTEXT_IGNORE_SECURITY);</span>
    } catch (NameNotFoundException e) {
      e.printStackTrace();
    }
    btnSet.setOnClickListener(new OnClickListener() {
      @Override
      public void onClick(View v) {
        new Handler().post(new Runnable() {
          @Override
          public void run() {
            layout.setBackgroundDrawable(<span style="color:#FF0000;">friendContext.getResources().getDrawable(R.drawable.bg</span>));
          }
        });
      }
    });
  }
}
皮肤应用中不需要界面显示
这个皮肤应用中的资源和主程序的资源命名一致即可.
清单文件:
<?xml version="1.0" encoding="utf-8"?>
<manifest xmlns:android="http://schemas.android.com/apk/res/android"
   package="com.tony.reskin1"
   android:versionCode="1"
   android:versionName="1.0" <span style="color:#FF0000;">android:sharedUserId="com.tony.skin"</span>>
  <uses-sdk android:minSdkVersion="7" />

  <application android:icon="@drawable/icon" android:label="@string/app_name">
    <activity android:name=".Re_Skin1Activity"
         android:label="@string/app_name">
      <intent-filter>
        <action android:name="android.intent.action.MAIN" />
        <category android:name="android.intent.category.LAUNCHER" />
      </intent-filter>
    </activity>

  </application>
</manifest>


