

Android动画的一个实战内容,从屏幕底部滑动弹出PopupWindow。 相信这种效果大家在很多APP上都遇到过,比如需要拍照或者从SD卡选择图片,再比如需要分享某些东西时,大多会采用这么一种效果:

那这种效果如何实现呢?
我们仿写一个这种效果的实例吧:
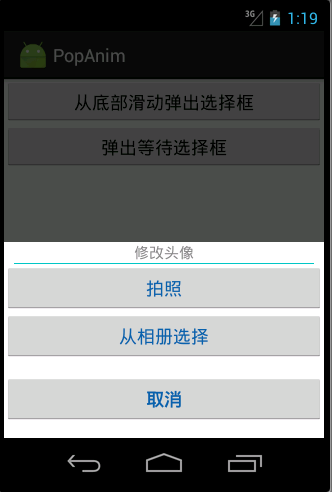
1)我们首先定义一下,弹出窗口的页面布局组件:take_photo_pop.xml
<?xml version="1.0" encoding="utf-8"?>
<RelativeLayout xmlns:android="http://schemas.android.com/apk/res/android"
 android:layout_width="fill_parent"
 android:layout_height="wrap_content"
 android:gravity="center_horizontal"
 android:orientation="vertical">

 <LinearLayout
 android:id="@+id/pop_layout"
 android:layout_width="fill_parent"
 android:layout_height="wrap_content"
 android:background="#ffffff"
 android:layout_alignParentBottom="true"
 android:gravity="center_horizontal"
 android:orientation="vertical">

 <TextView
  android:layout_width="fill_parent"
  android:layout_height="wrap_content"
  android:clickable="false"
  android:gravity="center"
  android:text="修改头像"
  android:textColor="#8a8a8a"
  android:textSize="15sp" />

 <View
  android:layout_width="fill_parent"
  android:layout_height="0.1dp"
  android:layout_marginLeft="10dp"
  android:layout_marginRight="10dp"
  android:background="#00c7c0" />

 <Button
  android:id="@+id/btn_take_photo"
  android:layout_width="fill_parent"
  android:layout_height="wrap_content"
  android:text="拍照"
  android:textColor="#0e61aa"
  android:textSize="18sp" />

 <Button
  android:id="@+id/btn_pick_photo"
  android:layout_width="fill_parent"
  android:layout_height="wrap_content"
  android:text="从相册选择"
  android:textColor="#0e61aa"
  android:textSize="18sp" />

 <Button
  android:id="@+id/btn_cancel"
  android:layout_width="fill_parent"
  android:layout_height="wrap_content"
  android:layout_marginBottom="15dip"
  android:layout_marginTop="15dip"
  android:text="取消"
  android:textColor="#0e61aa"
  android:textSize="18sp"
  android:textStyle="bold" />
 </LinearLayout>

</RelativeLayout>
2)现在定义动画,要知道该Popupwindow出现时是从页面底部向上滑动,消失时是从上向下滑动消失,,所以我们需要定义两个动画文件:
退出动画pop_exit_anim.xml
<?xml version="1.0" encoding="utf-8"?>
<set xmlns:android="http://schemas.android.com/apk/res/android">
 <translate
 android:duration="200"
 android:fromYDelta="0"
 android:toYDelta="50%p" />
 <alpha
 android:duration="200"
 android:fromAlpha="1.0"
 android:toAlpha="0.0" />
</set>
显示动画pop_enter_anim.xml
<?xml version="1.0" encoding="utf-8"?>
<set xmlns:android="http://schemas.android.com/apk/res/android">

 <translate
 android:duration="200"
 android:fromYDelta="100%p"
 android:toYDelta="0" />
 <alpha
 android:duration="200"
 android:fromAlpha="0.0"
 android:toAlpha="1.0" />
</set>
关于这两个动画,此处不再多做解析,读过我之前博文的都应该知道啦,很简单的,若是看不懂?请点击此文上方的链接学习之。
3)自定义弹出框Popupwindow:
import android.content.Context;
import android.graphics.drawable.ColorDrawable;
import android.view.LayoutInflater;
import android.view.MotionEvent;
import android.view.View;
import android.widget.Button;
import android.widget.PopupWindow;
import android.widget.RelativeLayout;

public class TakePhotoPopWin extends PopupWindow {

 private Context mContext;

 private View view;

 private Button btn_take_photo, btn_pick_photo, btn_cancel;


 public TakePhotoPopWin(Context mContext, View.OnClickListener itemsOnClick) {

 this.view = LayoutInflater.from(mContext).inflate(R.layout.take_photo_pop, null);

 btn_take_photo = (Button) view.findViewById(R.id.btn_take_photo);
 btn_pick_photo = (Button) view.findViewById(R.id.btn_pick_photo);
 btn_cancel = (Button) view.findViewById(R.id.btn_cancel);
 // 取消按钮
 btn_cancel.setOnClickListener(new View.OnClickListener() {

  public void onClick(View v) {
  // 销毁弹出框
  dismiss();
  }
 });
 // 设置按钮监听
 btn_pick_photo.setOnClickListener(itemsOnClick);
 btn_take_photo.setOnClickListener(itemsOnClick);

 // 设置外部可点击
 this.setOutsideTouchable(true);
 // mMenuView添加OnTouchListener监听判断获取触屏位置如果在选择框外面则销毁弹出框
 this.view.setOnTouchListener(new View.OnTouchListener() {

  public boolean onTouch(View v, MotionEvent event) {

  int height = view.findViewById(R.id.pop_layout).getTop();

  int y = (int) event.getY();
  if (event.getAction() == MotionEvent.ACTION_UP) {
   if (y < height) {
   dismiss();
   }
  }
  return true;
  }
 });


 /* 设置弹出窗口特征 */
 // 设置视图
 this.setContentView(this.view);
 // 设置弹出窗体的宽和高
 this.setHeight(RelativeLayout.LayoutParams.MATCH_PARENT);
 this.setWidth(RelativeLayout.LayoutParams.MATCH_PARENT);

 // 设置弹出窗体可点击
 this.setFocusable(true);

 // 实例化一个ColorDrawable颜色为半透明
 ColorDrawable dw = new ColorDrawable(0xb0000000);
 // 设置弹出窗体的背景
 this.setBackgroundDrawable(dw);

 // 设置弹出窗体显示时的动画,从底部向上弹出
 this.setAnimationStyle(R.style.take_photo_anim);

 }
}
定义要弹出的组件TakePhotoPopWin,它继承自PopupWindow,具体如何实现的,我备注信息很详细了。 有一个地方要提醒的是,就是最后要设置弹出窗体的显示动画,this.setAnimationStyle(R.style.take_photo_anim); 这是必不可少的,只有加上了它,才能应用动画效果!
看下take_photo_anim style的定义:
<style name="take_photo_anim" parent="android:Animation">
 <item name="android:windowEnterAnimation">@anim/pop_enter_anim</item>
 <item name="android:windowExitAnimation">@anim/pop_exit_anim</item>
</style>
就这么几步,一个可以从屏幕底部滑动弹出的组件
public void showPopFormBottom(View view) {
 TakePhotoPopWin takePhotoPopWin = new TakePhotoPopWin(this, onClickListener);
 //showAtLocation(View parent, int gravity, int x, int y)
 takePhotoPopWin.showAtLocation(findViewById(R.id.main_view), Gravity.CENTER, 0, 0);
}

private View.OnClickListener onClickListener = new View.OnClickListener() {
 @Override
 public void onClick(View v) {

 switch (v.getId()) {
  case R.id.btn_take_photo:
  System.out.println("btn_take_photo");
  break;
  case R.id.btn_pick_photo:
  System.out.println("btn_pick_photo");
  break;
 }
 }
};
这下子,效果就和我一开始传的图一致啦!有木有学会了呢!?
拓展:
玩过APP的大家都知道,在你进入新页面或者注册登录啥的时候,都会弹出一个等待的框框,表示网络请求中,你需要耐心等待下,比如微信的等待请求框效果如下:
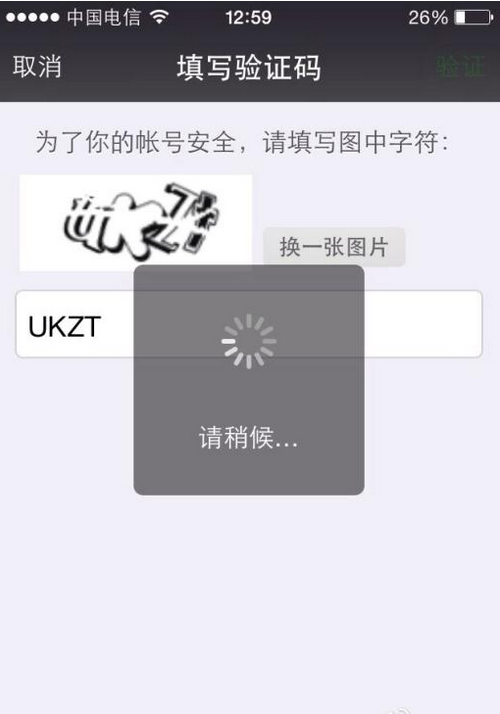
这里面其中也有个地方用到了动画,那就是不停旋转的那个小图标,它其实用的就是旋转动画!
关于如何实现这么样一个旋转等待框,我以前写过一篇介绍的文章,可查看: 《Android自定义ProgressDialog进度等待框》


