

本文实例讲述了Android之日期及时间选择对话框用法。分享给大家供大家参考。具体如下:
清单文件:
<?xml version="1.0" encoding="utf-8"?>
<manifest xmlns:android="http://schemas.android.com/apk/res/android"
 package="com.ljq.dialog"
 android:versionCode="1"
 android:versionName="1.0">
 <application android:icon="@drawable/icon" android:label="@string/app_name">
 <activity android:name=".AlertDialog"
   android:label="@string/app_name">
  <intent-filter>
  <action android:name="android.intent.action.MAIN" />
  <category android:name="android.intent.category.LAUNCHER" />
  </intent-filter>
 </activity>
 </application>
 <uses-sdk android:minSdkVersion="7" />
 <uses-permission android:name="android.permission.WRITE_CALENDAR" />
</manifest>
main.xml布局文件:
<?xml version="1.0" encoding="utf-8"?>
<LinearLayout android:id="@+id/LinearLayout01"
 android:layout_width="fill_parent" android:layout_height="fill_parent"
 android:orientation="vertical"
 xmlns:android="http://schemas.android.com/apk/res/android">
 <EditText android:id="@+id/et"
 android:layout_width="fill_parent"
 android:layout_height="wrap_content"
 android:editable="false"
 android:cursorVisible="false" />
 <Button android:text="日期对话框"
 android:id="@+id/dateBtn"
 android:layout_width="fill_parent"
 android:layout_height="wrap_content" />
 <Button android:text="时间对话框"
 android:id="@+id/timeBtn"
 android:layout_width="fill_parent"
 android:layout_height="wrap_content" />
 <DigitalClock
 android:text="@+id/digitalClock"
 android:textSize="20dip"
 android:gravity="center"
 android:id="@+id/DigitalClock01"
 android:layout_width="fill_parent"
 android:layout_height="wrap_content" />
 <AnalogClock
 android:id="@+id/analogClock"
 android:gravity="center"
 android:layout_width="fill_parent"
 android:layout_height="wrap_content" />
</LinearLayout>
AlertActivity类:
package com.ljq.dialog;
import java.util.Calendar;
import android.app.Activity;
import android.app.DatePickerDialog;
import android.app.Dialog;
import android.app.TimePickerDialog;
import android.os.Bundle;
import android.view.View;
import android.widget.Button;
import android.widget.DatePicker;
import android.widget.EditText;
import android.widget.TimePicker;
public class AlertDialog extends Activity {
 private Button dateBtn = null;
 private Button timeBtn = null;
 private EditText et=null;
 private final static int DATE_DIALOG = 0;
 private final static int TIME_DIALOG = 1;
 private Calendar c = null;
 @Override
 public void onCreate(Bundle savedInstanceState) {
 super.onCreate(savedInstanceState);
 setContentView(R.layout.main);
 et=(EditText)findViewById(R.id.et);
 dateBtn = (Button) findViewById(R.id.dateBtn);
 timeBtn = (Button) findViewById(R.id.timeBtn);
 dateBtn.setOnClickListener(new View.OnClickListener(){
  public void onClick(View v) {
  showDialog(DATE_DIALOG);
  }
 });
 timeBtn.setOnClickListener(new View.OnClickListener(){
  public void onClick(View v) {
  showDialog(TIME_DIALOG);
  }
 });
 }
 /**
 * 创建日期及时间选择对话框
 */
 @Override
 protected Dialog onCreateDialog(int id) {
 Dialog dialog = null;
 switch (id) {
 case DATE_DIALOG:
  c = Calendar.getInstance();
  dialog = new DatePickerDialog(
  this,
  new DatePickerDialog.OnDateSetListener() {
   public void onDateSet(DatePicker dp, int year,int month, int dayOfMonth) {
   et.setText("您选择了:" + year + "年" + (month+1) + "月" + dayOfMonth + "日");
   }
  },
  c.get(Calendar.YEAR), // 传入年份
  c.get(Calendar.MONTH), // 传入月份
  c.get(Calendar.DAY_OF_MONTH) // 传入天数
  );
  break;
 case TIME_DIALOG:
  c=Calendar.getInstance();
  dialog=new TimePickerDialog(
  this,
  new TimePickerDialog.OnTimeSetListener(){
   public void onTimeSet(TimePicker view, int hourOfDay, int minute) {
   et.setText("您选择了:"+hourOfDay+"时"+minute+"分");
   }
  },
  c.get(Calendar.HOUR_OF_DAY),
  c.get(Calendar.MINUTE),
  false
  );
  break;
 }
 return dialog;
 }
}
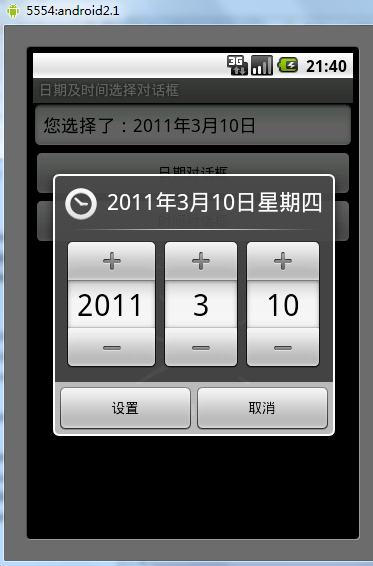
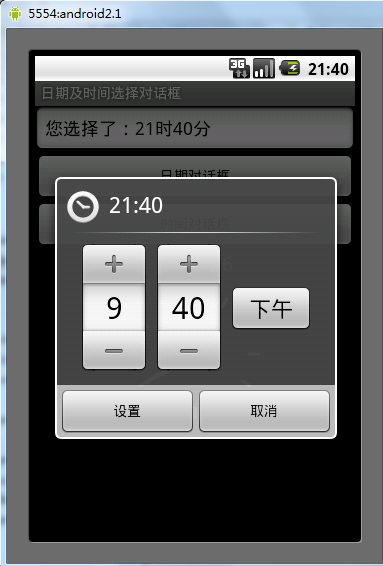
运行结果:
希望本文所述对大家的Android程序设计有所帮助。


