
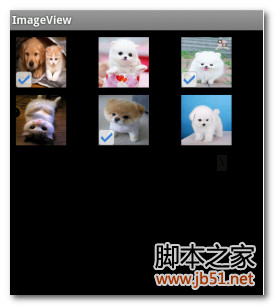
具体代码如下:
main.xml
xmlns:tools="http://schemas.android.com/tools"
android:background="#000000"
android:layout_width="fill_parent"
android:layout_height="fill_parent"
tools:context=".MainActivity" >
<GridView
android:layout_width="fill_parent"
android:layout_height="fill_parent"
android:id="@+id/grid"
android:verticalSpacing="3dp"
android:horizontalSpacing="3dp"
android:numColumns="3"
></GridView>
</LinearLayout>
item.xml
<LinearLayout xmlns:android="http://schemas.android.com/apk/res/android"
android:layout_width="match_parent"
android:layout_height="match_parent"
android:orientation="vertical" >
<ImageView
android:scaleType="fitXY"
android:padding="3dp"
android:layout_height="70dp"
android:layout_width="70dp"
android:id="@+id/image_item"
/>
</LinearLayout>
public class MainActivity extends Activity {
private Adpter adpter;
private GridView gridView;
@Override
protected void onCreate(Bundle savedInstanceState) {
super.onCreate(savedInstanceState);
setContentView(R.layout.main);
int [] image={R.drawable.dog1,R.drawable.m2,R.drawable.m3,R.drawable.m4,R.drawable.m5,R.drawable.dog2};
adpter=new Adpter(image, this);
gridView=(GridView) findViewById(R.id.grid);
gridView.setAdapter(adpter);
gridView.setOnItemClickListener(new OnItemClickListener() {
@Override
public void onItemClick(AdapterView<?> arg0, View arg1,
int position, long arg3) {
adpter.chiceState(position);
}
});
}
}
Adpter.java
import android.content.Context;
import android.graphics.Bitmap;
import android.graphics.BitmapFactory;
import android.graphics.drawable.BitmapDrawable;
import android.graphics.drawable.Drawable;
import android.graphics.drawable.LayerDrawable;
import android.util.Log;
import android.view.LayoutInflater;
import android.view.View;
import android.view.ViewGroup;
import android.widget.BaseAdapter;
import android.widget.ImageView;
public class Adpter extends BaseAdapter {
private int[] image;
private boolean isChice[];
private Context context;
public Adpter(int[] im, Context context) {
this.image = im;
Log.i("hck", im.length+"lenght");
isChice=new boolean[im.length];
for (int i = 0; i < im.length; i++) {
isChice[i]=false;
}
this.context = context;
}
@Override
public int getCount() {
return image.length;
}
@Override
public Object getItem(int arg0) {
return image[arg0];
}
@Override
public long getItemId(int arg0) {
return arg0;
}
@Override
public View getView(int arg0, View arg1, ViewGroup arg2) {
View view = arg1;
GetView getView=null;
if (view == null) {
view = LayoutInflater.from(context).inflate(R.layout.item, null);
getView = new GetView();
getView.imageView=(ImageView) view.findViewById(R.id.image_item);
view.setTag(getView);
} else {
getView = (GetView) view.getTag();
}
getView.imageView.setImageDrawable(getView(arg0));
return view;
}
static class GetView {
ImageView imageView;
}
//主要就是下面的代码了
private LayerDrawable getView(int post) {
Bitmap bitmap = ((BitmapDrawable)context.getResources().getDrawable(image[post])).getBitmap();
Bitmap bitmap2=null;
LayerDrawable la=null;
if (isChice[post]== true){
bitmap2 = BitmapFactory.decodeResource(context.getResources(),
R.drawable.editable_mode_checked_tag);
}
if (bitmap2!=null) {
Drawable[] array = new Drawable[2];
array[0] = new BitmapDrawable(bitmap);
array[1] = new BitmapDrawable(bitmap2);
la= new LayerDrawable(array);
la.setLayerInset(0, 0, 0, 0, 0); //第几张图离各边的间距
la.setLayerInset(1, 0, 65, 65, 0);
}
else {
Drawable[] array = new Drawable[1];
array[0] = new BitmapDrawable(bitmap);
la= new LayerDrawable(array);
la.setLayerInset(0, 0, 0, 0, 0);
}
return la; // 返回叠加后的图
}
public void chiceState(int post)
{
isChice[post]=isChice[post]==true?false:true;
this.notifyDataSetChanged();
}
}


